
Oh, the sacrifices we make for our gardens. For three days, I have surrendered beer for my pole beans.
I planted the starters 10 days ago, and all was well. Last year, the pole beans were one of my easiest crops. All I had to do was plant the seeds and they took off. I had snacks available every time I stepped onto the deck.
Late last week, it looked like my arch nemesis, the aphid, was back. Those little green suckers have chomped way too many leaves on me in the past. I rushed out to the nursery and grabbed a bottle of Neem Oil and was ready to go to battle the next day.
But the holes in the leaves seemed a lot bigger than they should have been. I doubled down on the spray in the daylight. On Sunday evening, as it got a little darker, I realized the aphids were a mere distraction.
My attacker this time was bigger.
Slimmier.
Sluggier.
Slugs. I founds a slug on a leaf.
In damp, dark Seattle, slugs are as common as Thai food and coffee. But I don’t have ordinary slugs. I have industrious slugs.
Caffeinated slugs.
These slug in my pole beans didn’t just crawl over from the neighbor’s yard or the nearest salmon run. My pole beans are planted in a big container. On a rubber covered deck. 60 feet in the air.
And they got up there.
I don’t know if they hitched a ride on a bird, snuck in with the plants from the nursery, or scaled the side of the building.
Fortunately, if there’s one thing we learned from The Simpsons, it’s that beer is the perfect solution to any problem.
Slugs like beer, and slugs are dumb. I built slug traps.
To deal with slugs, you can dig a small hole in the dirt, and bury a small yogurt container up to the rim, and pour in some beer about a quarter or half way and leave it overnight. The scent of beer will attract the slugs. The slimy bastards will wiggle their way over to feast on the beer. They’ll slither down the side for a sip, reach the beer, dive in, and drown. The beer gorging is like 1:00 AM at a Capitol Hill bar with cheap pitchers and unlimited chicken wings. Only most bar goers don’t drown in their meal. Most.
My new nightly ritual involves dumping the previous night’s flat beer and dead slugs into a zip lock bag, which I then drop drown the trash chute. Then I open another beer and [sob] refill the container. Then I drink the rest of the beer.
Tonight I took it another step. I added a small, formerly-juiced-filled bottle on its side with more beer bait. I have to get more creative with these slugs.
Because I think the slugs are getting bigger. They’re starting to level up. Again.
Showing posts with label Garden. Show all posts
Showing posts with label Garden. Show all posts
2012-05-24


2011-04-25
A contained Tulip Festival
The weather was not kind to the Skagit Valley Tulip Festival this year. The chilly spring and non-stop drizzle delayed the tulip blooms quite a bit. Whereas during many years you could drive up there in the mid-April and see acres and acres of brilliant color that looked like you could set sail on and float across a sea of red, this year, it wasn’t quite to be.
When my Mother and I took the drive up there one afternoon, there was plenty of green, and the occasional spot of yellow as the Daffodils made their last stand, the tulip blooms remained scarce.

Fortunately, we still got to experience the reds and purples of the Roozengaarde display gardens. The contained and disciplined gardens showcase a variety of blooms and it was a enough of a tulip fix for the year.
I shot these images using the same macro lens I brought to the Northwest Flower and Garden Show.
This is just a sampling of the pictures from that day. You can find more of my pictures from that day here, on my Flickr page.

Of course it was drizzling that day, which made walking in the nature more complicated, but it did do some interesting things to the flowers. The water droplets clung to the tulips as though they feared being soaked up by the ground.


They also did something that’s I’d only every seen on CSI. They captured the reflection of neighboring plants, the sky, and me. Granted, it was more of a silhouette and a bit distorted. It would never result in my conviction for anything, but it was still quite cool.
I’m not sure how well that translates to the small image posted in Blogger; you may need to open the images to their full size on Flickr to check it out (Image 1, Image 2, Image 3).


In this shot, I used the flash. It made the water droplets on the ruffled petal edges sparkle like an artificial, fiber optic Christmas tree. It’s a little challenging to see it in this post, but you can see a larger version here.

I was able to get very tight on this one.


They did some creative stuff with the flowers, creating a blue river of Irises through the beds.

It wasn’t the wide swaths of color I’d seen in previous years, but it was still worth the visit.
You can find posts from previous visits to the Tulip Festival here:
And you can find more pictures from various years here.
When my Mother and I took the drive up there one afternoon, there was plenty of green, and the occasional spot of yellow as the Daffodils made their last stand, the tulip blooms remained scarce.

Fortunately, we still got to experience the reds and purples of the Roozengaarde display gardens. The contained and disciplined gardens showcase a variety of blooms and it was a enough of a tulip fix for the year.
I shot these images using the same macro lens I brought to the Northwest Flower and Garden Show.
This is just a sampling of the pictures from that day. You can find more of my pictures from that day here, on my Flickr page.

Of course it was drizzling that day, which made walking in the nature more complicated, but it did do some interesting things to the flowers. The water droplets clung to the tulips as though they feared being soaked up by the ground.


They also did something that’s I’d only every seen on CSI. They captured the reflection of neighboring plants, the sky, and me. Granted, it was more of a silhouette and a bit distorted. It would never result in my conviction for anything, but it was still quite cool.
I’m not sure how well that translates to the small image posted in Blogger; you may need to open the images to their full size on Flickr to check it out (Image 1, Image 2, Image 3).


In this shot, I used the flash. It made the water droplets on the ruffled petal edges sparkle like an artificial, fiber optic Christmas tree. It’s a little challenging to see it in this post, but you can see a larger version here.

I was able to get very tight on this one.


They did some creative stuff with the flowers, creating a blue river of Irises through the beds.

It wasn’t the wide swaths of color I’d seen in previous years, but it was still worth the visit.
You can find posts from previous visits to the Tulip Festival here:
Tulips and Hail
And you can find more pictures from various years here.
2011-04-10
Life in the Garden Part 46: Northwest Flower and Garden Show 2011

Somehow it survived and once February rolled around it was again time for the Northwest Flower and Garden Show. The last serveral Christmases my mother gave me a new lens for my camera, and I've always used that new lens as the sole one I bring to the garden show, This year, that lens is a Sigma 105mm f/2.8 EX DG Medium Telephoto Macro Lens.
The lens gave me some nice reach and was fast enough for most shots I wanted to take (especially when I used a monopod). The great thing about it, especially for this event, was the macro capability. I got some really detailed shots. The disadvantage for many of the shots, though, was that same long reach I mentiond a moment ago. There were shots I couldn't take because I couldn't stand back far enough without other people getting in the shot, or me knocking over everything that was behind me.
I find this to be a good exercise from time-to-time. It forces me to think more about the pictures I want to take, and I have to make decisions that I don't have to make when I carry my full kit.
This was a neat idea for a fake Koi pond -- fish figurines in black grass.

This was from the section on Ikebana.


The show gardens had a fictional character theme.


The small gardens section in the atrium over Pike St. always has asome great views and creative designs.


The doll diorama was also interesting. They were all having a BBQ in the back yard. And the whole display was in a converted day bed.


The tradeshow has lots of neat stuff for an actual dirt-based garden for people who have "land" or "space." Neither of which really applies to me, but there was still stuff worth seeing.
I managed to spend very little money at the show, except, of course, for the two container sized apple trees I bought for my deck. I may now be just a year away from growing my own apples.
If you're into gardening, plants, flowers, vegetables and related stuff, and are in the Seattle area, check out the show next year. And good luck on not spending so much on stuff you can't afford seeds.

More pictures from this year's show are available here.
Other posts I've written about the Garden show:
2011-03-01: Problem with a QR Code
2010-06-04: Life in the Garden Part 40: Northwest Flower and Garden Show – 2010
2009-02-22: The strengths and limitations of my new lens
2009-09-21: Life in the Garden Part 09: Photography and the Garden Show
2010-11-24
Life in the Garden Part 45: Carrots
The garden wasn't a big success this year; Seattle just didn't get warm and sunny enough (shocking, I know), but there were a few bright spots. One of those spots was my carrot crop.
I planted a few carrots for use in salads, or for when The GF needs to throw one into a stock or soup or some other magical thing that comes out of her kitchen. Neither of us is a big fan of carrots (she's gotten skilled at picking out carrot bits with chop sticks) but they are a useful ingredient. And home grown vegetables always taste best anyway.
What I like about the carrot crop is that it is hardy. Once the vegetable grow, I can leave them in the ground until I'm ready for them. Tomatoes and strawberries have to come off their vines as soon as they ripen, but carrots are content to sit there in the dirt growing bigger and drinking water.

That's how one carrot looked on 2010-10-23. It got pretty twisted up in the ground.
I think the big mistake I make with my carrots was planting my seedling in peet pots to start them, instead of planting straight in the ground. Normally thin roots grow right through the peet pots so it's not an issue. With carrots, though, the one big root is the whole point. So my carrots had to twist and split them selves in order to grow. Next year, I'll direct sow.
It is getting into November, and it was time to enjoy more of the garden's bounty. I pulled that carrot on 2010-11-16, and here's what I got:


It was quite a bit of carrot for one plant. I suppose you could argue it was multiple plants.
To prep it, I cut off the hub and was left with these:

I scrubbed them, and they cleaned up easily. They were also easy to peel. I did all that, and then chopped them up and tried a bit.

They were crisp and clean and tasted like carrots. They may have been a little less pungent than commercial carrots, but they were still pretty good. They are not so good that I will sit on the couch and eat them like Twizzlers, but they're not disgusting.
So what did I do with the carrots? Ramen.

This was any ordinary Nissin Top Ramen though, (okay the bowl I had after this was the regular Nissin Top Ramen). This was Sapporo Ichiban Ramen.

They carrots were good in the Ramen. They soaked up broth but stayed crispy. They also cooled off the boiling water when I put them in. They turned out to be a really nice addition to the soup. Plus I can now pretend it's healthy soup.
This is reason enough to grow more next year.
You can see more of my carrots and other garden picture here.
You can read more about Life in the Garden here.
I planted a few carrots for use in salads, or for when The GF needs to throw one into a stock or soup or some other magical thing that comes out of her kitchen. Neither of us is a big fan of carrots (she's gotten skilled at picking out carrot bits with chop sticks) but they are a useful ingredient. And home grown vegetables always taste best anyway.
What I like about the carrot crop is that it is hardy. Once the vegetable grow, I can leave them in the ground until I'm ready for them. Tomatoes and strawberries have to come off their vines as soon as they ripen, but carrots are content to sit there in the dirt growing bigger and drinking water.

That's how one carrot looked on 2010-10-23. It got pretty twisted up in the ground.
I think the big mistake I make with my carrots was planting my seedling in peet pots to start them, instead of planting straight in the ground. Normally thin roots grow right through the peet pots so it's not an issue. With carrots, though, the one big root is the whole point. So my carrots had to twist and split them selves in order to grow. Next year, I'll direct sow.
It is getting into November, and it was time to enjoy more of the garden's bounty. I pulled that carrot on 2010-11-16, and here's what I got:
It was quite a bit of carrot for one plant. I suppose you could argue it was multiple plants.
To prep it, I cut off the hub and was left with these:
I scrubbed them, and they cleaned up easily. They were also easy to peel. I did all that, and then chopped them up and tried a bit.
They were crisp and clean and tasted like carrots. They may have been a little less pungent than commercial carrots, but they were still pretty good. They are not so good that I will sit on the couch and eat them like Twizzlers, but they're not disgusting.
So what did I do with the carrots? Ramen.
This was any ordinary Nissin Top Ramen though, (okay the bowl I had after this was the regular Nissin Top Ramen). This was Sapporo Ichiban Ramen.
They carrots were good in the Ramen. They soaked up broth but stayed crispy. They also cooled off the boiling water when I put them in. They turned out to be a really nice addition to the soup. Plus I can now pretend it's healthy soup.
This is reason enough to grow more next year.
You can see more of my carrots and other garden picture here.
You can read more about Life in the Garden here.
2010-08-23
Life in the Garden Part 44: Zucchini
I mentioned before that the zucchini is doing fairly well. That's fortunate because the GF is a big fan of it.


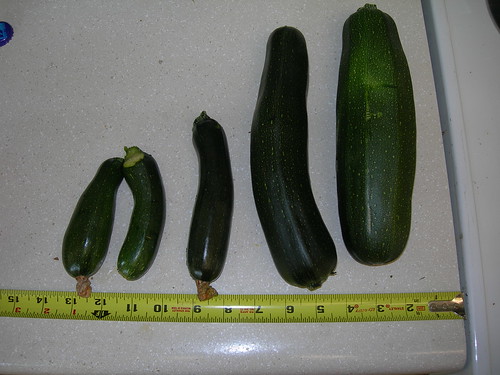
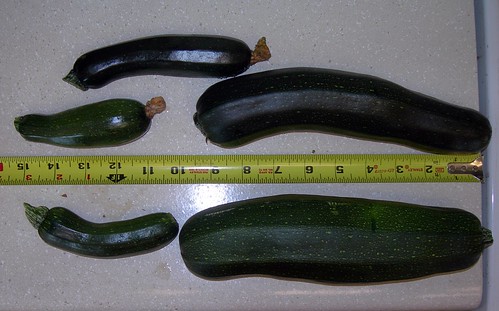
I started this year's zucchini from seed and got it outdoors in May. I'm growing some plants in and Earthbox and others in terra cotta. They're both producing at decent levels. Each week, I can harvest at least 5-6 baby zukes and some really big ones.
These are the ones I harvested on 2010-07-21.
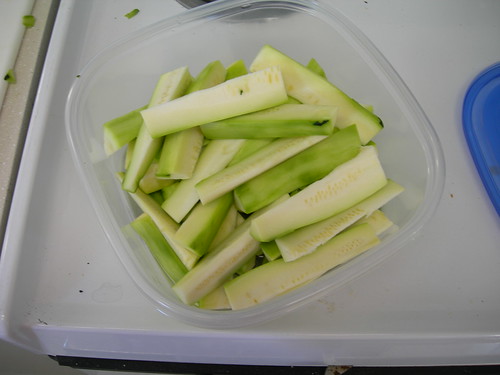
I sliced them up:
I coated them with salt, pepper, and oil (at the direction of The GF (it turns out I did it wrong -- I was supposed to oil the grill, not the zukes. Oops. ) (my expertise ends when they are no longer attached to the plant)). Then I tossed them on the grill.

We ended up with some tasty and healthful (if unattractive) snacks.
Perhaps next year, I'll add one more zucchini plant to the mix. Enough so we don't run out -- not so much that we get sick of them.
2010-08-17
Life in the Garden Part 43: Romaine Growth
About a month ago, I posted about a salad I grew in my garden. This is how my Romaine Lettuce looked then:

This is how it looked on Sunday:

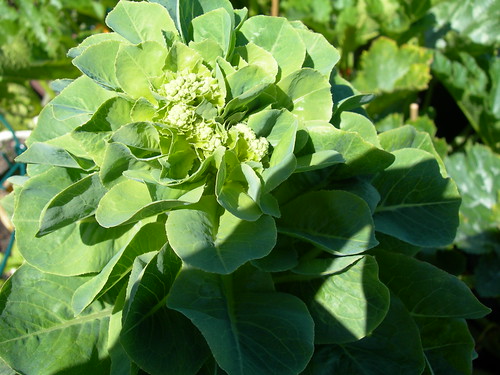
It's now over two feet tall. You see those bare stalks? That's not because the plant got leggy. It's because I've been eating the leaves. Romaine grown in the Earthbox has been one my most successful crops this year. It's also been extremely easy.
But we may be hitting the end of it. There are tiny flower at the tops of the stalks.

Leafy vegetables grow flowers to produce seeds to make more plants. In other words, once it flowers fully, its genetic destiny is done. The best way to stretch the growing season is to remove those flower early -- literally nip them in the bud.
When you do that, hopefully, the plant will focus on producing leaves for dozens of salads yet to be eaten.
The more immediate result, though, is the Romaine milk. Sap, really. When you pull or pinch off the flowers, the sticky, thick, white liquid oozes up out of the stem.

Here's a tip. Don't eat the liquid. The Romaine flavor is strong in liquid, but so is the bitter, sour flavor that apparently evolved to discourage small, woodland critters from eating the stalks.
Regardless, it's great to have a fresh head out on the deck at all times. I can head out there to water the plants, munch on a strawberry, a string bean, and the tear off a lettuce leaf, all without going to the grocery store.
Next year -- even more greens.
Past Life in the Garden posts are available here.

This is how it looked on Sunday:
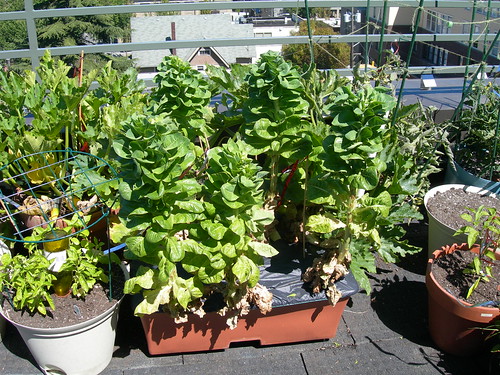
It's now over two feet tall. You see those bare stalks? That's not because the plant got leggy. It's because I've been eating the leaves. Romaine grown in the Earthbox has been one my most successful crops this year. It's also been extremely easy.
But we may be hitting the end of it. There are tiny flower at the tops of the stalks.
Leafy vegetables grow flowers to produce seeds to make more plants. In other words, once it flowers fully, its genetic destiny is done. The best way to stretch the growing season is to remove those flower early -- literally nip them in the bud.
When you do that, hopefully, the plant will focus on producing leaves for dozens of salads yet to be eaten.
The more immediate result, though, is the Romaine milk. Sap, really. When you pull or pinch off the flowers, the sticky, thick, white liquid oozes up out of the stem.

Here's a tip. Don't eat the liquid. The Romaine flavor is strong in liquid, but so is the bitter, sour flavor that apparently evolved to discourage small, woodland critters from eating the stalks.
Regardless, it's great to have a fresh head out on the deck at all times. I can head out there to water the plants, munch on a strawberry, a string bean, and the tear off a lettuce leaf, all without going to the grocery store.
Next year -- even more greens.
Past Life in the Garden posts are available here.
2010-08-02
Life in the Garden Part 42: Who sells brackets in Seattle?
I'm on a quest for deck bracket for my plants. I need more brackets so I can hang more window boxes like this:

I am amazed at how hard they are to find.
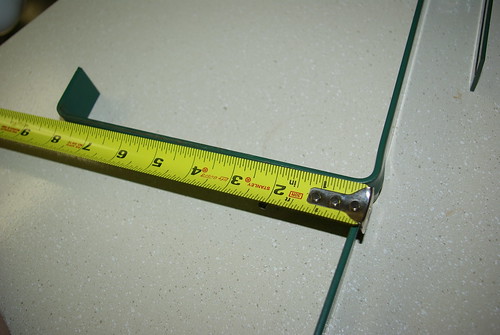
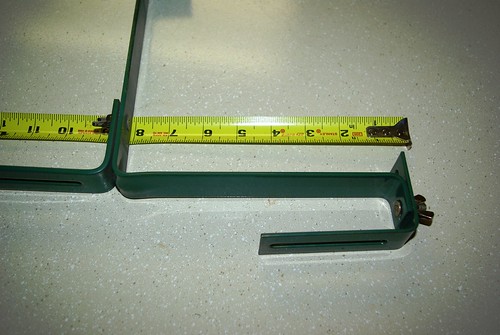
Most brackets on the market have two problems. First, they often assume a railing wider than 1.5". Secondly, they assume that the vertical supports for the railing will be 18" or so apart. They don't work on my deck. When I try them, the planter invariably swings precariously.
The brackets I currently use are awesome, but I can't find them any place.
Here are some images.

The great thing about this design is the tail at the bottom. While the tray support the weight of the planter, and the hook puts the weight on the railing, the tail at the bottom keeps the planter level. Because it leans against the rail below, it prevents the window box from swinging.


I've been to nurseries, hardware stores, general merchandise stores and still have had not luck finding them.
I got my first set when I bought some self-watering window boxes from Gardeners.com. They came with the window box. Unfortunately, they don't appear to sell them separately, and $40 for the window box seems a bit steep, especially since I have enough window boxes.
Any suggestions? Perhaps it's time to seek out someone who knows how to build things like this.

I am amazed at how hard they are to find.
Most brackets on the market have two problems. First, they often assume a railing wider than 1.5". Secondly, they assume that the vertical supports for the railing will be 18" or so apart. They don't work on my deck. When I try them, the planter invariably swings precariously.
The brackets I currently use are awesome, but I can't find them any place.
Here are some images.

The great thing about this design is the tail at the bottom. While the tray support the weight of the planter, and the hook puts the weight on the railing, the tail at the bottom keeps the planter level. Because it leans against the rail below, it prevents the window box from swinging.


I've been to nurseries, hardware stores, general merchandise stores and still have had not luck finding them.
I got my first set when I bought some self-watering window boxes from Gardeners.com. They came with the window box. Unfortunately, they don't appear to sell them separately, and $40 for the window box seems a bit steep, especially since I have enough window boxes.
Any suggestions? Perhaps it's time to seek out someone who knows how to build things like this.
Subscribe to:
Posts (Atom)

