

I added an air deflector to my car today. It's that bump on top in front of the moon roof (or is it a sun roof? I always get those two mixed up).
I added it to my 2004 Subaru Forester to make things quieter.
Previously, I couldn't open the moon roof on the highway due to the roar of the wind. I also caught a bunch of sun through the moon roof whether it was opened or closed. The air deflector (part number: F541SSA00) mitigates those problems.
The instructions were a bit a challenge, so I hope this will help anyone else who wants to try installing one. These images are from the directions and from my own installation.
Step 1 -- Read the directions

Step 2 -- Clean the roof


Step 3 -- Open the moon roof


Step 4 -- Attach the metal clips to the moon roof

Attach the nuts loosely. The instructions specify two turns for a reason. If you tighten it more than than, you won't be able to hook the clips to the car in the later steps.
The deflector itself shipped covered with clingey plastic wrap. I left it on while I did the installation to minimize chances I would damage the plastic. I just pulled it back from the area where I was working.
The instruction recomend using a wrench and screwdriver to manage the nuts and bolts. They suggest a fixed size wrench. I tried using an open-end adjustable wrench but it was awkward. I ended up using a pair of vice grips. The vice grips made it easier to hold on to the nut when working at difficult angles. A regular wrench may work if you have an assistant. For a one person job, I suggest the vice grips.


Step 5 -- Position the air deflector on the roof

Just position it on the roof to get an idea of how it fits. This is good time to make sure the rubber gasket is firmly in place on the deflector and hasn't come loose in travel.
Step 6 -- Mark the edges of the air deflector on the room

I'm not sure why you do this. It's easy enough to see where the deflector goes.
Step 7 -- Lift the deflector off the roof

Step 8 -- Clean and add tape


This is wear I made a mistake. I hope it doesn't cause problems on the road.
I put the Subaru tape (Part E in the diagram) flat on the roof at the corners. I realize now when I look at the diagram more closely, it should hve covered the edge where the clips from Step 4 will actually go. The inset with the right angle explains that, but I didn't get it at the time.
Step 9 -- Remove the masking tape
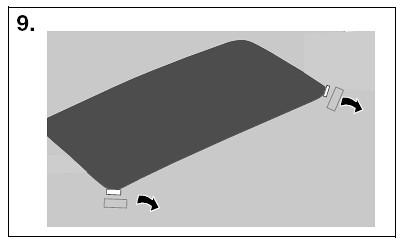
Step 10 -- Place the air deflector flat and evenly on the roof

Step 11 -- Hook the clips to the metal of the roof inside the lip of the moon roof
The images in the directions are pretty poor. They don't include enough detail to show what you hook the clips too.

If you tightened the nuts too tight in step four, you won't be able to hook them in here. So loosen them.
The other challenge here is that the edge of the air deflector is flat, but the roof of the car is actually curved. It may take a bit of work to get the clips to hook on wear they need to.


Make sure the rubber gasket is flat against the roof and not curled up under the air deflector.
Fitting the clips under the metal may take some effort. Once you have the clips in place, tighten the screws and bolts.
Step 12 -- Tighten everything

Step 13 -- Now that everything is attached, make sure you did everything right.

Generally, watch out for the struts that support the small metal wind gard as the front of the open moon roof. You will often have to hold that deflector in its flat, closed position while you do the work. Also, make sure the clips are attached to the metal of the open window frame and not the various struts or other components that make up the window. Test things frequently to make sure the window still opens and closes properly.

You can find more pictures of my installation here.
The whole process took me about an hour, but that including figuring out the directions and going on line to find page 3 of the directions.
I'm pleased with how it came out. It stayed firmly attached at highway speed and didn't vibrate. I really did cut the wind noise. I suppose it may help mileage, too, but I'm not counting on that.
So I'm calling it a success.
Of course while I did the install, I was listening to the car radio and some how managed to kill my battery, but that's another story.


No comments:
Post a Comment